Keep your SharePoint in sync. Download and try today.
How to use the BDLC API with SharePoint Designer
In this article, we describe how to make use of the BDLC API with in workflows created with the SharePoint Designer 2010 or 2013 to automate deployments or provisioning BDLC configurations to SharePoint project rooms or just to maintain your BDLC environment.
The key point of this article is to create custom activities you can use inside the SharePoint Designer.
Requirements and test environment
- The referenced project runs on a SharePoint 2010 server.
- Workflow model 2010
- You´ll need to reference against the BDLC assembly Layer2.SharePoint.BusinessDataListConnector.dll
- This article needs the code project “Layer2.Tools.BdlcListCreator” as reference. It is available as download here.
You can easily adapt the example to SharePoint 2013.
Explaining the code
The solution contains a SharePoint project with a web applications scoped feature, some SequenceActivities and the actions xml declaration.
SequenceActivity
The “Bind” action will serve as an example here. The purpose of this activity is to trigger a binding of the BDLC functionality to a certain list.
The class itself inherits from SequenceActivity.
The properties that will be inserted in SharePoint Designer are DependancyProperties. It contains two parts, the DependancyProperty itself and the corresponding property, referenced by the registration in the DependancyProperty.
Code Snippet:
public static DependencyProperty SelectStatementProperty = DependencyProperty.Register("SelectStatement", typeof(string), typeof(Bind), new PropertyMetadata(""));
[DescriptionAttribute("SelectStatement")]
[BrowsableAttribute(true)] [DesignerSerializationVisibilityAttribute(DesignerSerializationVisibility.Visible)]
[ValidationOption(ValidationOption.Optional)]
public string SelectStatement
{
get { return ((string)(GetValue(SelectStatementProperty))); }
set { SetValue(SelectStatementProperty, value); }
}
The activity itself needs an overridden method named Execute. Inside this method is the code that should be executed during the activity.
protected override ActivityExecutionStatus Execute(ActivityExecutionContext executionContext)
{
try
{
BindBdlcList();
return ActivityExecutionStatus.Closed;
}
catch (Exception ex)
{
return ActivityExecutionStatus.Faulting;
}
}
The code running against the BDLC API is inside of another class, we will examine this later.
Actions XML
Inside the Actions XML declaration, we will describe and define the workflow activity settings as xml. We have to define each of our configured properties and field and as parameter as well.
Create a SharePoint mapped folder “Workflow” and add an XML code file to it. Name it with the file extension “.actions”.
Each action looks like the following example:
<Action Name="Bind List to BDLC source (Listname as Dropdown)"
ClassName="Bind"
Assembly="Layer2.Tools.BdlcListCreator, Version=1.0.0.0, Culture=neutral, PublicKeyToken=85e5654b501d6c61"
AppliesTo="all"
Category="BDLC Activity">
<RuleDesigner Sentence="Bind the List %5 with Statement %4, ConnectionString %1, Provider %2 and PrimaryKey %3. Use Write-back: %6 / use Background Update: %7">
<FieldBind Field="ConnectionString" Text="ConnectionString" DesignerType="TextArea" Id="1"/>
<FieldBind Field="ConnectionProvider" Text="Connection Provider" DesignerType="TextArea" Id="2"/>
<FieldBind Field="PrimaryKey" Text="PrimaryKey" DesignerType="TextArea" Id="3"/>
<FieldBind Field="SelectStatement" Text="SelectStatement" DesignerType="TextArea" Id="4"/>
<FieldBind Field="ListName" Text="ListName" DesignerType="ListNames" Id="5"/>
<FieldBind Field="WriteBack" Text="WriteBack" DesignerType="Dropdown" Id="6" >
<Option Name="Yes" Value="True"/>
<Option Name="No" Value="False"/>
</FieldBind>
<FieldBind Field="BackgroundUpdate" Text="BackgroundUpdate" DesignerType="Dropdown" Id="7" >
<Option Name="Yes" Value="True"/>
<Option Name="No" Value="False"/>
</FieldBind>
</RuleDesigner>
<Parameters>
<Parameter Name="__Context" Type="Microsoft.SharePoint.WorkflowActions.WorkflowContext, Microsoft.SharePoint.WorkflowActions" Direction="In" />
<Parameter Name="BackgroundUpdate" Type="System.String, mscorlib" Direction="In" />
<Parameter Name="WriteBack" Type="System.String, mscorlib" Direction="In" />
<Parameter Name="ConnectionString" Type="System.String, mscorlib" Direction="In" />
<Parameter Name="ConnectionProvider" Type="System.String, mscorlib" Direction="In" />
<Parameter Name="PrimaryKey" Type="System.String, mscorlib" Direction="In" />
<Parameter Name="SelectStatement" Type="System.String, mscorlib" Direction="In" />
<Parameter Name="ListName" Type="System.String, mscorlib" Direction="In" />
</Parameters>
</Action>
RuleDesigner references the bound fields through their id number. The parameters again contain the different configured fields. All parameters are set to be IN parameters, if you want to pass new parameters out to make use of them in workflow variables, you have to adjust these pieces.
Feature
The web application scoped feature modifies the web.config of the targeted web application to accept our custom activities as authorized.
Inside the FeatureActivated event we run some code to insert the AuthorizedType addition to the appropriate section.
public override void FeatureActivated(SPFeatureReceiverProperties properties)
{
SPWebApplication wappCurrent = (SPWebApplication)properties.Feature.Parent;
SPWebConfigModification modAuthorizedType = new SPWebConfigModification();
modAuthorizedType.Name = "authorizedType[@Namespace='Layer2.Tools.BdlcListCreator']";
modAuthorizedType.Owner = "BDLC.Actions";
modAuthorizedType.Path = "configuration/System.Workflow.ComponentModel.WorkflowCompiler/authorizedTypes";
modAuthorizedType.Type = SPWebConfigModification.SPWebConfigModificationType.
EnsureChildNode;
modAuthorizedType.Value = @"<authorizedType Assembly='Layer2.Tools.BdlcListCreator, Version=1.0.0.0, Culture=neutral, PublicKeyToken=85e5654b501d6c61'
Namespace='Layer2.Tools.BdlcListCreator' TypeName='*' Authorized='True' />";
wappCurrent.WebConfigModifications.Add(modAuthorizedType);
wappCurrent.WebService.ApplyWebConfigModifications();
}
Helpers
The class “BdlcList” contains all the logic accessing the BDLC API and executing the different actions. Here we use the referenced BDLC API dll and can perform all needed actions. If you not sure what can be done, take a look in our Programmers Guide that is available in your BDLC download.
Deployment
This solution can be deployed a normal full trust solution to your SharePoint 2010 solutions store. Once it´s there, you can make use of it in your SharePoint Designer, wether you run it on the server or the client.
How to use in SharePoint Designer
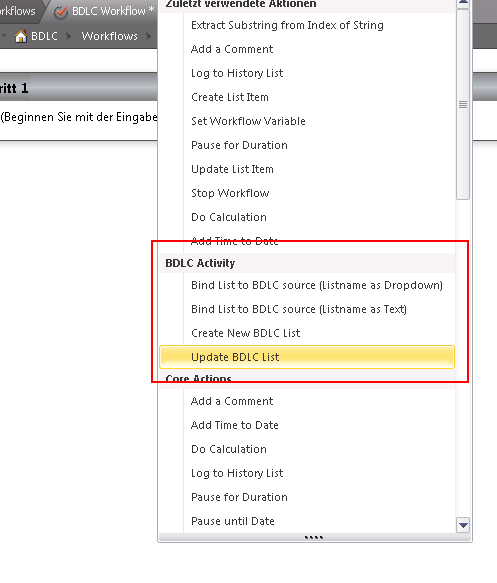
If everything went right, you should now be able to use your own custom activities in SharePoint Designer 2010.

And you can use the activities within your workflow:

READY TO GO NEXT STEPS?
