Keep your Sharepoint in sync. Download and try today.
How to Connect External Data With SharePoint Using the Secure Store
The Layer2 Business Data List Connector for SharePoint can be used to connect almost any external data source to a native SharePoint list, e.g. contacts, tasks, events, or custom items. It can make use of the SharePoint Secure Store to store all security relevant information safely.
Usually, connectivity information for external data, like connection strings and accounts, are managed directly in the SharePoint list settings. SharePoint security can be used to restrict access rights to list settings, if required.
Alternatively, the SharePoint Secure Store Service can be used to file ConnectionStrings and Windows/AD User Accounts hidden within the Secure Store and not within the BDLC list settings. You can use the following syntax instead of the connection string:
- securestore:<ApplicationId> or
- securestore:applicationid=<ApplicationId>
With the syntax below, BDLC is using the indicated application and selects the entry "connection". If a Windows user and a corresponding password are given, the information is used to impersonate the specified account.
- securestore:applicationid=<ApplicationId>;connectionid=<ConnectionId>
The syntax below gives the BDLC Admin the opportunity to select the ConnectionString with the given key. By doing this, multiple different connections can be used within a single SecureStore Application.
- securestore:applicationid=<ApplicationId>;connectionid=<ConnectionId>;userid=<UserId>;passwordid=<PasswordId>
By using the notation above, the user is also being specified to be impersonated. To impersonate eligible users, they have to be part of a valid AD, whose domain the SharePoint Server is running in or to whose domain a bond of trust exists. The user name has to be indicated as: "domain\username".
The BDLC is always accessing the default Secure Store. There is only one Secure Store Service for each WebApplication. The Application Pool Account of the Web Application has to have the entry "Act as part of the operating system" in the Local Security Policies. The account who should be impersonated has to have the right "Allow log on locally" in the Local Security Policies. Only the data access is completed within the process of impersonation. All other activities are completed as usual in the context of the current user/ system user (executed by a TimerJob).
Using Secure Store with BDLC - Best Practice
If you have already set up a Secure Store Service Application:
The BDLC can, while using Secure Store Services, only select the ConnectionStrings from the Secure Store. Therefore your application has to have the entry "Generic". The name of the entry can be selected by tagging and clicking on "set"
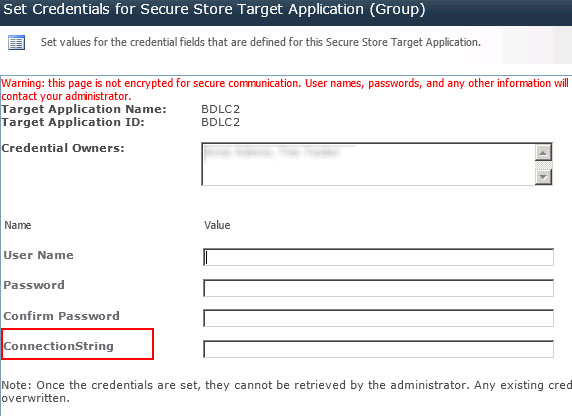
Fig. Connection String attribute in Secure Store.
Enter the Target Application ID of your Secure Store Service application as ApplicationId.
Example: Your application has the Target Application ID "MyTargetApplication". You can use one of the connection strings given below.
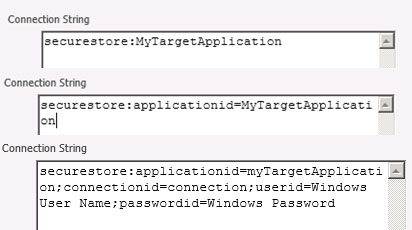
Fig. Sample Connection Strings that are using the Secure Store.
If you haven't set up a Secure Store Service Application:
Configure the Secure Store Service as described in the following link (https://technet.microsoft.com/en-us/library/ee806866.aspx). Choose a new application. Select the Target Application Type "Group".
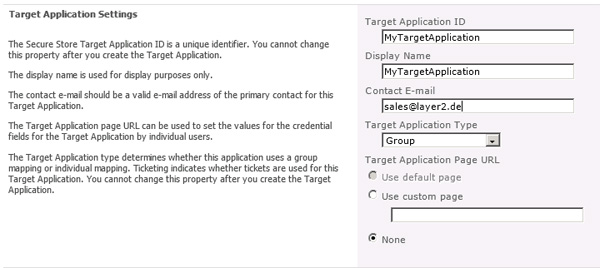
Fig. Create an Application entry in Secure Store.
Specify the Credential Fields for later usage.

Fig. Add credential fields for your Application.
Only credential types "Windows User Name" with the corresponding "Windows Password" can be used for impersonation. Please keep in mind that by specifying multiple credentials with the same field type the correct credentials have to be specified by using IDs. If this information is missing the last available credentials are selected.
In the final step you select the Target Application Administrator and the authorized users. Please keep in mind that the Target Application Administrator has no user access to the application automatically.
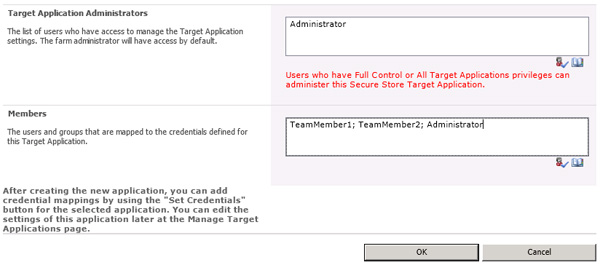
Fig. Define the Target Application Administrator for the given application.
After clicking OK the application is configured. You can now start to fill in your required data, by selecting the application and clicking "Set" on the ribbon-bar. Please keep in mind that previously filled in data in this sector will never be shown for security reasons.
Note - Make sure that the following parameter is in the Connection string: Integrated Security=true;
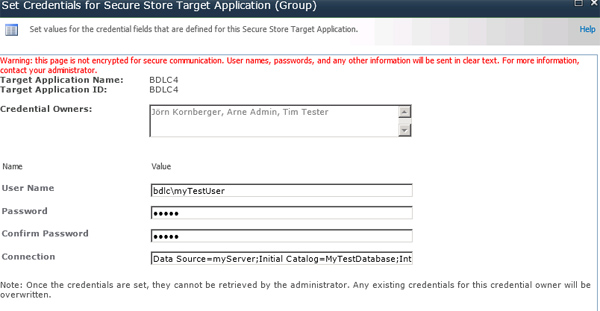
Fig. Finally you can enter your access data and connection string for the application.
You can now start to configure your connection to the BDLC by using the Secure Store tag "securestore:" as shown below. Users who have administrative privileges are only seeing IDs and not the actual data of the connection strings.
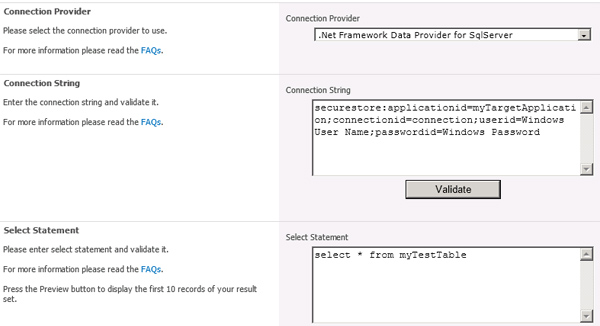
Fig. Sample usage of secure store in BDLC configuration settings. Security-relevant information is hidden from users.
Using Secure Store with BDLC - Known Issues and Workarounds
Please note the following error messages and possible reasons and workarounds.
Unable to find SecureStore Application! Please check if you have permissions to access this SecureStore Application or if this store actually exists. (L2)
- Reason 1: The current user has no access privilege to Secure Store Service Application. Those have to be set in the configuration of the application (see step 3 „Members“). Please remember that the Target Application Administrator has no access privilege to the content of the application.
- Reason 2: The given ApplicationId cannot be found within the Secure Store Service. Check the notation of the Application ID (Case-sensitivity is disregarded).
Unable to retrieve domain from username. Please make sure you are providing the full loginname (e.g. domain\username) when using WindowsUser! (L2)
- Reason: BDLC cannot solve the given username correctly. For a successful impersonation the username and domain have to be given.
Unable to read a connectionstring from Secure Store Application! Please check the connection id and the settings in your secure store application (L2)
- Reason 1: The given ConnectionId is spelled wrong. Check your notation.
- Reason 2: The given ConnectionId is not existing within the Secure Store Application.
- Reason 3: By using the syntax without ConnectionId no entry with the Key „connection“ is existing within the Secure Store Application.
Error message in the “Background update” section: Unable to find SecureStore Application! Please check if you have permissions to access this SecureStore Application or if this store actually exists. (L2)
- Issue: The BDLC connected list is not been updated in background and its BDLC settings page displays an error message in the “Background update” section: Unable to find SecureStore Application! Please check if you have permissions to access this SecureStore Application or if this store actually exists.
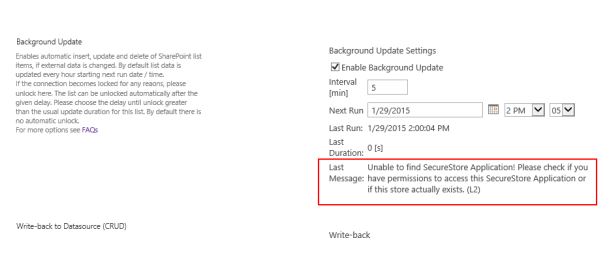
- Reason: SharePoint Timer Service is running with its own Windows identity. This identity needs member permissions to the SharePoint Secure Store application in order to get the background update working.
- Solution: The pool account of the SharePoint Timer Service has to be part of the member group in the used Secure Store application.
- How to get the pool account: On your SharePoint server, open the Task Manager, select details and look for the OWSTIMER.exe process. The connected user name is the pool account name (see below).

- How to set the pool account: Set the pool account as member in your secure store application (see below).
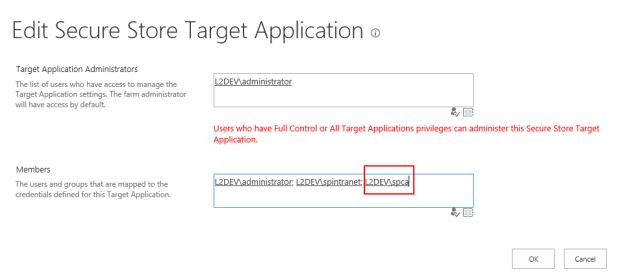
- After that, the BDLC background update should work as expected.
Error message on a BDLC 2013 connected list using the secure store after editing any list item data with write-back enabled: Unable to find SecureStore Application! Please check if you have permissions to access this SecureStore Application or if this store actually exists. (L2)

- Reason: In SharePoint 2013 there is no way to retrieve the claims user currently used in the event receiver. The accessible users are the current SharePoint user and the Windows identity, which is in this case the application pool account of this SharePoint web application. Normally, for this account there is no read/member permissions set to the secure store application.
- Solution: The application pool account of the web application has to be part of the member group in the used secure store application.
- How to get the application pool account: In Central Administration, select Security -> Configure service accounts. Select your SharePoint web starting with “Web Application Pool”. The connected pool account will be displayed below.
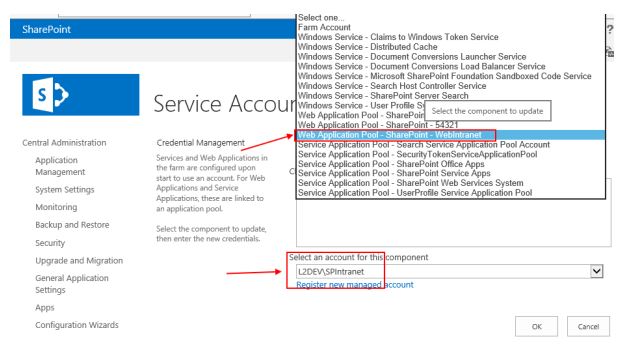
- How to set the pool account: You can set the account as member in your secure store application as shown below.
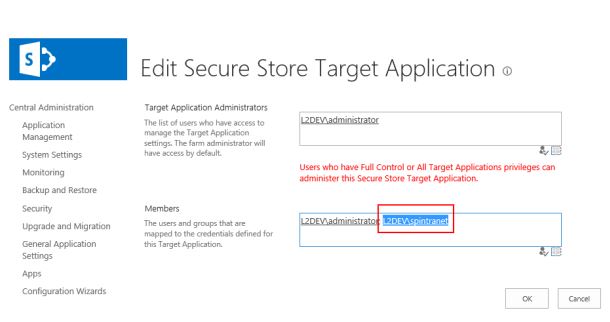
- After that BDLC write-back should work as expected.
If you have any other issues with secure store and BDLC please contact sales@layer2solutions.com directly.
READY TO GO NEXT STEPS?
