Keep your SharePoint in sync. Download and try today.
Office 365: How to sync SQL data with SharePoint lists?
The Layer2 Cloud Connector can connect almost any on-premise or cloud-based data source directly to native SharePoint lists and libraries in the Microsoft Office 365 cloud - or any Microsoft SharePoint on-premises installation - in just minutes, without any programming, and without to make changes in network or the in the connected systems. ODBC, OLEDB, OData, Microsoft .NET based providers, file content (Excel, XML, CSV), file shares, SQL databases like SQL Server, Oracle, MySQL, IBM DB2, IBM AS/400, IBM Informix, Notes, systems like SharePoint, Exchange, Active Directory, Navision, SAP, PowerShell and many more sources are supported.
Integrating specifically external SQL data sources (e.g. from SQL Server, Oracle, DB2, Informix, MySQL) with native SharePoint lists (e.g. news, contacts, tasks or custom lists) in Office 365, SharePoint Online or SharePoint on-premises can close many gaps. Important to know: It's not only about displaying external SQL data - it's about full integration with views, search, lookups, forms, change notifications, and workflows.
This FAQ gives a step-by-step example with Microsoft SQL Server how to do this. It works in the same way for any other database.
Prepare your external SQL data source to integrate with Office 365
Let's take a sample SQL table, the well-known Northwind product catalog in SQL Server.
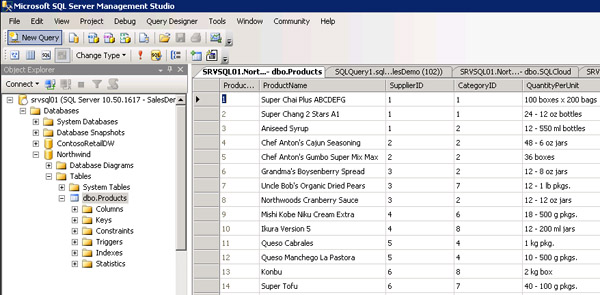
Fig.: The screen shows a sample SQL table to connect with a native SharePoint list.
Please note:
- You can use existing tables or views, or create direct queries in the Layer2 Cloud Connector.
- The table should have a primary key defined, one or more unique fields. If not, you can create, e.g. using a GUID or counter (depending on features of your database system).
- You can even make use of SQL procedures (e.g. for aggregation or to include business logic), but take care of that they return a record set (similar to a normal SQL query).
Setup your SQL to SharePoint connection
With the Cloud Connector Connection Manager (a MMC snap-in) you have to setup:
1. the connection (e.g. uni-directional or bi-directional, scheduling etc.),
2. the data source (your SQL database) and
3. the data destination (in SharePoint on-premise, SharePoint Online or Office 365. The list must be created manually before).
You can use auto mapping to connect the fields of both data entities by name or map fields manually.
See here for sample connection settings:
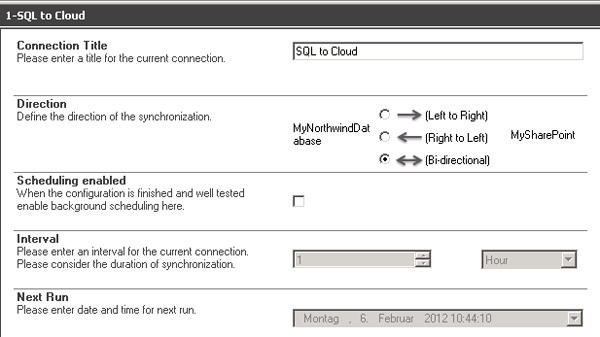
Fig.: Sample SQL to Office 365 bi-directional connection.
Please note:
- Bi-directional connections require appropriate access rights on database. Use uni-directional connections if you want to push SQL data only to the cloud.
- Please enable scheduling later on, when all settings are verified and you have an idea of replication duration. Duration time depends on bandwidth, performance of source and destination, and number of fields and records in SQL. Only changes are transferred later on.
Before running the connection, you have to define the data source and destination.
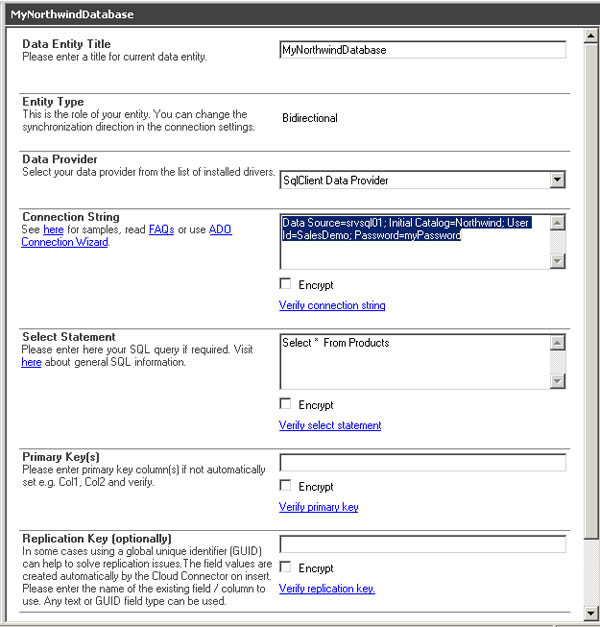
Fig.: The pre-installed SQL Provider is used to connect to the data source with a connection string.
Please note:
- Select the SQL Provider that fits to your database. If it's not in list, it must be installed. Take care about 64-Bit and 32-Bit. The Cloud Connector can run in both modes, but it can connect only to those providers, that fits.
- Enter a valid connection string for your database system. See www.connectionstrings.com to know.
- The provider offers the possibility to enter direct queries, depending on database system. Select as few fields as required to increase performance.
- For most systems you can use aliases in field names to fit to your SharePoint Online list, e.g. Select Productname as Title from products.
- Use the data preview to check out the result of your query.
- For most systems a "primary key" is set automatically.
- Please verify all settings before save.
Next you have to define your data destination:
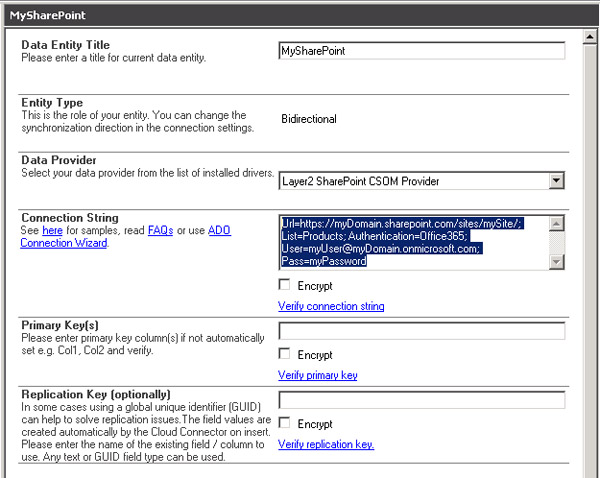
Fig.: Data destination sample, a list "Products" in the Office 365 cloud.
Please note
- Use the Layer2 SharePoint CSOM Provider to connect to SharePoint on-premise, SharePoint Online or Office 365.
- You have to create the destination list manually with all columns required to host your query data.
- Read more about connection strings to connect to Office 365, SharePoint Online or SharePoint on-premise here. Please note that you can connect to any other type of data destination, e.g. to other SQL databases.
- There is no need to enter a primary key, the provider automatically uses the SharePoint item ID.
As a last step you have to setup the column / field mapping. You can use the auto-mapping feature (by field / column names) or map manually.
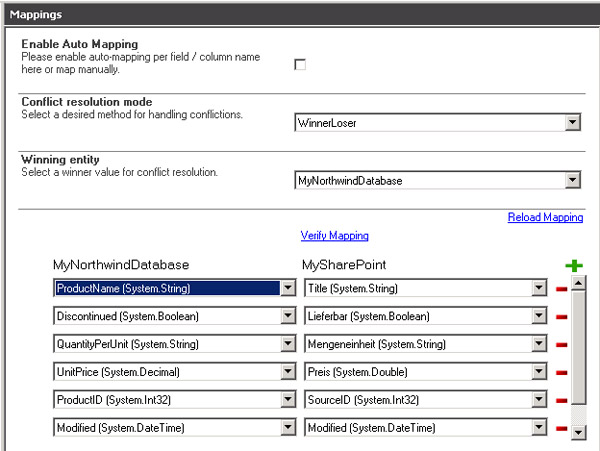
Fig.: Sample field / column mapping of data source and data destination.
- Please note the mapping of ProductName to Title, as SharePoint required a Title field.
- In this case we have included the SourceID to have a clear reference to the
original record.
That is not a requirement, but advised as best practice. - Please note the difference in data types. The Layer2 Cloud Connector tries to match as close as possible.
If all settings are verified, please go to connection root and run the connection manually first. Please note, that it could take some time to transfer all nodes. You can take a look in your cloud list to see how it goes on.
Manage your SQL data in the Office 365 SharePoint list
Now take a look at your list. All items are in there, after running the connection. You can hide the Source ID in the view, if not required.
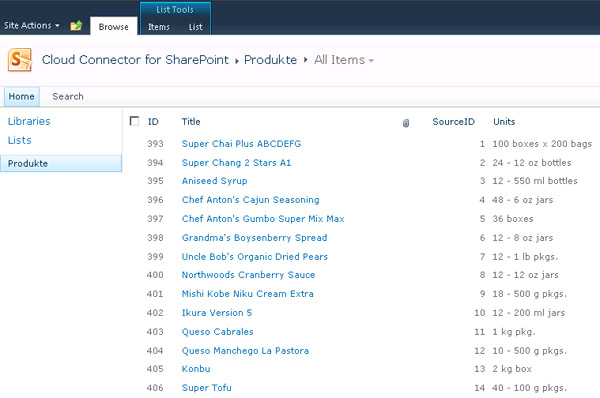
Fig.: Sample data destination in the Office 365 cloud.
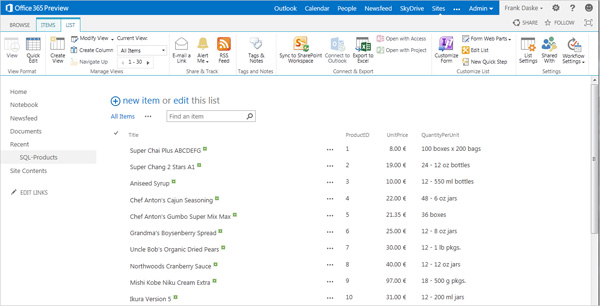
Fig.: Sample data destination in Microsoft SharePoint 2013 / Office 365.
Please note:
- Changed items are transferred with the next scheduled update. That means, you can setup change notifications per-email or workflows in the cloud without any restrictions.
- You can add additional "SharePoint only" data, e.g. attachments or managed metadata. It will be kept while items are updated (via primary key).
- You can use Dynamic Columns in C# for data cleanup, calculation, translation or transformation. A great option to add your own business logic directly to the sync. You can also add business logic in SQL (by using procedures), or in SharePoint (by using workflows)
- You can do anything you can generally do with a native SharePoint list - without any restrictions (e.g. search, Office / Outlook integration, Flow).
- Don't forget to setup the scheduled background update, to keep data current in connection settings, e.g. with scheduled updates every hour or daily.
Explore frequently asked questions by topics.
Ready to go next steps?
