Keep your SharePoint in sync. Download and try today.
How to Activate a Layer2 Product?
To benefit from the full feature-set, Layer2 products need activation with a license file. The following describes the activation process for certain products.
Activating a Layer2 product only takes 3 simple steps.
No re-installation or configuration changes are required. The existing evaluation version installation of the Layer2 product is kept working.
- 1. Send server name(s) to Layer2 (sales@layer2solutions.com)
- 2. Receive product key(s) from Layer2
- 3. Place the product key on the server(s)
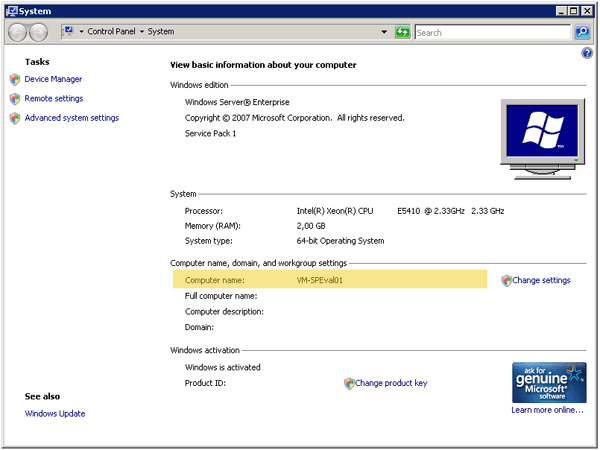
If you have successfully ordered a Layer2 product license using the web shop, you will be asked by email for your computer name(s). Please send us the server name(s) required for your specific product key. You'll find the server names, depending on operating system version, in the computer's system Properties dialogue.

Fig. Example server name as required for product key: VM-SPEval01
In case you have ordered several licenses, just let us know all server names to license, separated by production and non-production.
Step 2 - Receive the Product Key File(s)
Once we have the server name(s), we will generate your personal product key file and deliver it to you via an email attachment within 48h (working days). The file may be zipped, in which case please unzip the file first. Please open the file and verify that the licensor information and all server names are correct.
This file is signed. Please do not modify this file. It will become invalid if it is modified in any way. The file name must be as delivered: productkey.xml
If any information is incorrect in the product key file or it does not work as expected, please contact sales@layer2solutions.com directly. In case the server names have changed, please contact sales@layer2solutions.com too. If you have a valid Software Assurance, you will receive a new product key file within 24h (working days). The old key file will become invalid a few days after the new key is issued.
Step 3 - Place the Product Key File on Server(s)
The product key file has to be placed in the server's file system in the locations specified for each product below. Please also note the instructions in your license email.
Instructions for Layer2 File Pal
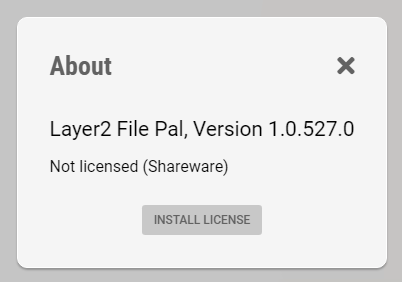
Log on to the server with appropriate access rights. Save the product key to the host server - on the desktop or in any (non-systems) folder. Start the application Layer2 File Pal. Click on the "i" symbol in the upper right corner to open the "About" popup.

Click on INSTALL LICENSE and navigate to the folder where you saved the license file. Select the license file in the file explorer and click Open to install the license.
When the license is installed correctly, the license information is displayed in the popup and the Shareware banner on the main screen is no longer shown.
Instructions for Layer2 Cloud Connector
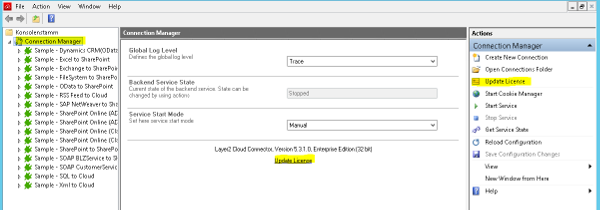
Log on to the server with appropriate access rights. Save the product key to the host server. Open the Layer2 Cloud Connector Connection Manager. Click the Connection Manager node. Click either the Update License link in the central pane or the right-hand Actions menu. In the dialog, select the productkey.xml file and click Open. After updating the license file, please restart the Layer2 Cloud Connector Windows service (Stop/Start Service in the right-hand Actions menu).

Fig. Where you can update the license file in the Layer2 Cloud Connector UI.
You can also copy, do not move, the license file into the License directory: C:\ProgramData\Layer2 Cloud Connector\License\
OR for older versions of Windows: C:\Documents and Settings\All Users\Layer2 Cloud Connector\License\
Once the new license file has been placed, verify that the version information no longer lists "Shareware", which will indicate the license was installed correctly. If not, please see Additional Assistance below.
Instructions for the Layer2 Business Data List Connector (BDLC)
Log on with appropiate access rights to the server. Copy, do not move, the productkey.xml file into the following directory:
C:\Program Files\Common Files\Microsoft Shared\Web Server Extensions\16\TEMPLATE\FEATURES\Layer2.Products.BusinessDataListConnector\
For earlier versions of SharePoint, it may be under:
SharePoint 2010: ...\14\TEMPLATE\FEATURES\Layer2.Products.BusinessDataListConnector\
SharePoint 2013: ...\15\TEMPLATE\FEATURES\Layer2.Products.BusinessDataListConnector\
SharePoint 2016: ...\16\TEMPLATE\FEATURES\Layer2.Products.BusinessDataListConnector\
After placing the files, just reload the BDLC settings page. No need to restart the application. Check that the BDLC List settings now longer lists the version as "Shareware", which will indicate the license was installed correctly. If not, please see Additional Assistance below.
Don't forget to activate all licensed servers.
Additional Assistance
If there are no changes (product is still showing ShareWare mode or has the
restrictions), please check server name(s) again. Most problems with activations
are caused by invalid server names. Please note: Server Names are not case sensitive.
If you need further assistance, please check FAQs or contact sales@layer2solutions.com directly.
Explore frequently asked questions by topics.
READY TO GO NEXT STEPS?
