Keep your Quickbooks Desktop in sync. Download and try the Layer2 Cloud Connector today.
QuickBooks Desktop Integration with Office 365, SharePoint and 150+
Intuit QuickBooks Desktop data can be integrated and synchronized codeless with various other data sources using the Layer2 Cloud Connector Enterprise Edition via our Quickbooks data providers. Please take a look at our Solution page for supported target systems and applications like various SQL databases, Microsoft Office 365, SharePoint, Exchange, Dynamics, and many others.

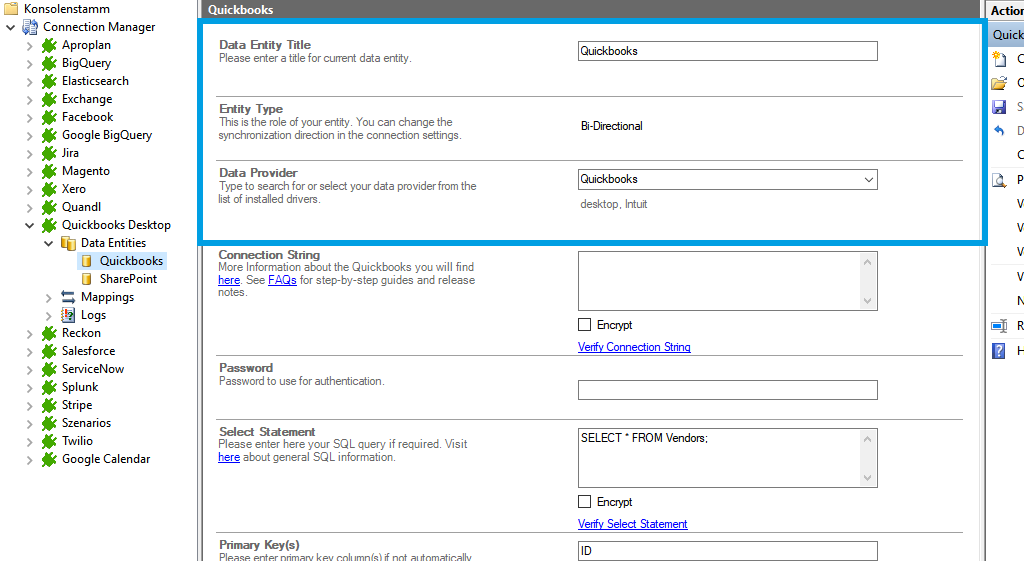
You can connect supported data sources to Quickbooks Desktop without code. To connect to Intuit QuickBooks Desktop, the data entity must be configured as follows in the Layer2 Cloud Connector Connection Manager:
Fig. Example connection configuration to connect to Intuit QuickBooks Desktop customers list via Quickbooks data provider.
QuickBooks Desktop Specific Integration Settings
Please note the following Intuit QuickBooks specific settings.
- You will also need to install and configure the Remote Connector for QuickBooks. See the Remote Connector website for more instructions for how to configure this. Make sure this is running prior to testing the connection to QuickBooks from the Cloud Connector.
- Choose the “QuickBooks” as Data Provider for your data entity (source and / or destination).
- When you first connect, there will be a dialog in QuickBooks asking you to authorize the application. Once this is authorized, you will be able to execute commands to QuickBooks.
- Follow the vendor instructions for setting up the connection string, for example:URL=http://myHost:2080; User=myUser; Password=myPassword;
- You can make use of all SQL queries. If you want to see all available tables and views, use this following selects:
SELECT * FROM sys_tables
SELECT * FROM sys_views - Please make sure to define an appropriate primary key.
- The Layer2 Cloud Connector only supports reading from QuickBooks Desktop. Write is not supported at this time.
- You can map your data query fields to specific external fields in the Layer2 Cloud Connector. Please take care about data types (simple type conversions are supported).
- No installation or changes are required with any data entity connected.
- Data synchronization can be started manually in the Connection Manager, per command line or scheduled in background by the Layer2 Cloud Connector Windows Service. Only data changes are processed (no delete / bulk import).
- No programming required for setup a connection and sync.
- No need to open your local network for access from outside.
QuickBooks Desktop Integration - Known Issues and Workarounds
- Both the ADO .NET and ODBC provider's write functions do not work with the Cloud Connector at this time. QuickBooks Desktop is supported as read-only.
- If you have connection errors, make sure the Remote Connector is running and that your company file is open in a QuickBooks instance being run as "administrator".
- You can either close QuickBooks after each synchronization or make sure that your company file is constantly open in multi-user mode. If you do not follow this requirement, the next synchronization might fail with the following error: "QuickBooks cannot currently be accessed."
- If you want to access QuickBooks from a different machine, you have to run the Remote Connector on the QuickBooks system. Make sure the port is opened.
Step-by-Step Intros For Codeless QuickBooks Desktop Data Integration And Synchronization
Just some ideas what to connect next with to QuickBooks queries:
- Sync with Microsoft Exchange (on-premises or online) for calendar events and appointments, mobile access and offline availability on any device. Public folders also supported.
- Sync with 3rd party tools like ERP/CRM/CMS based on SQL databases like Oracle, MySQL or Microsoft SQL Server.
- Sync with Microsoft SharePoint or Office 365 for better collaboration (for example with customers or partners) or for intranet publishing. Change notifications and workflows fully supported.
- Integrate with Microsoft Dynamics CRM/ERP/NAV etc.
- You will find more systems to connect here.
OAuthClientID=<your_client_id>;
OAuthClientSecret=<your_client_secret>;
InitiateOAuth=GETANDREFRESH;
Select Statement:
SELECT * FROM Messages WHERE ChannelID=’CBZVAAE6L’ AND SearchTerm Like ‘’;
You can get all available tables with:
SELECT * FROM sys_tables;
You can get all available views with:
SELECT * FROM sys_views;
Ready to go next steps?


