Keep your Sharepoint in sync. Download and try today.
Microsoft Dynamics CRM Integration with SharePoint and Outlook
How do you integrate Microsoft Dynamics CRM online or on-premises with SharePoint and Outlook? The Cloud Connector for Microsoft Office 365 and SharePoint connects almost any on-premises data source, e.g. ODBC, OLEDB, OData, Microsoft .NET-based providers, Files (Excel, XML, CSV), SQL databases (like SQL Server, Oracle, MySQL, IBM DB2, IBM AS/400, IBM Informix, Notes), SharePoint, Exchange, Active Directory, Navision, SAP, and many more directly to native SharePoint lists and libraries in the Microsoft Cloud - or any other Microsoft SharePoint installation - in just minutes without any programming.

Please follow these steps to integrate native SharePoint lists (2010, 2013, Online, Office 365 or OneDrive f.B.), e.g. contacts, with Microsoft Dynamics CRM Online or on-premises.
If you are a Microsoft Dynamics CRM customer, you will most certainly have all your business contact information stored within your CRM environment. Accessing these contacts within a collaborative environment such as Microsoft SharePoint can be of great value to every single employee. Although the CRM offers a great integration in Microsoft Outlook, it might be a massive overhead for employees who just need to access the contact details. Integrating to a SharePoint contact list with Microsoft Outlook is a much easier approach. The Layer2 Cloud Connector provides read / write access to Microsoft Dynamics CRM – on-premises or online. Please note: The Connector requires one CRM user account / license to access the CRM data for replication to SharePoint. SharePoint users access the native SharePoint lists only - with no connection to CRM required. They do not need any license for CRM in this scenario.
Microsoft Dynamics CRM Integration with SharePoint & Office 365 - Documentation
Please find documentation linked here and in the related content at the left page margin.
Fig. Please click image to start the presentation.
Setting Up Your Data Sources
Setting Up Dynamics CRM
No setup or changes are required on the CRM side. Microsoft Dynamics CRM includes two central lists for storing Contacts and Accounts. Contacts represent individuals who have a First Name, a Last Name, and further Contact Details. Accounts represent the associated companies that the contacts belong to. Microsoft SharePoint does not make this distinction and only supports Contact Lists. Therefore, the SharePoint environment will need two Contact Lists to store Accounts and Contacts retrieved from Dynamics CRM.
In this example, we will be focused on the Accounts list.
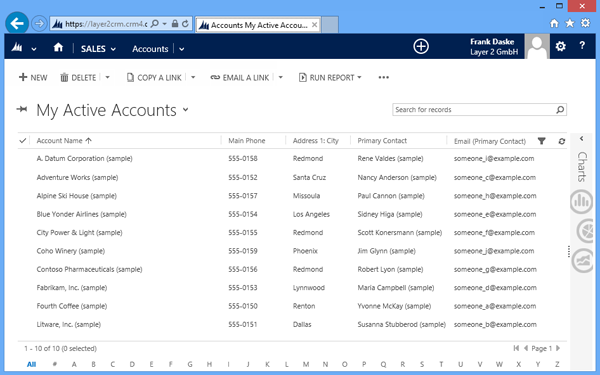
Fig. Accounts list in Microsoft Dynamics CRM Online (Sample data from trial).
Setting Up SharePoint
No installation or changes are required on the SharePoint side. Simply create the SharePoint data destination list manually, adding the necessary columns to hold the data from Dynamics CRM. The list does not necessarily have to be a Contact-type list, but if you want to synchronize the accounts with Microsoft Outlook later on, using a Contact-type list is highly recommended. You can add additional columns, such as for sales volume or AccountID (to better know where the item's data comes from).
Set Up Your Dynamics CRM to SharePoint Connection
Set Up the Layer2 Cloud Connector Connection
In the Layer2 Cloud Connector, you can create a new connection or simply copy the "Sample - Dynamics CRM(OData) to SharePoint" connection and edit to fit your environment. We will start with a uni-directional connection to synchronize the CRM accounts into the SharePoint list created in the section above. Your new connection will look something like this:
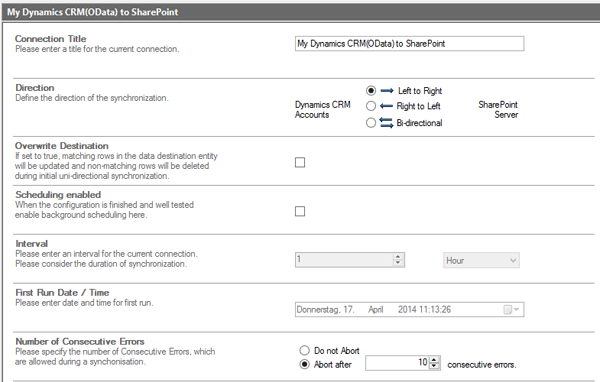
Fig. Layer2 Cloud Connector example connection settings.
It is best practice to start with getting a manual connection working first. You can add scheduling and more options later on once you've confirmed everything is syncing correctly.
Set Up the Microsoft Dynamics CRM Data Entity
The next step is to prepare data entities for connection. Let's start with the CRM side.
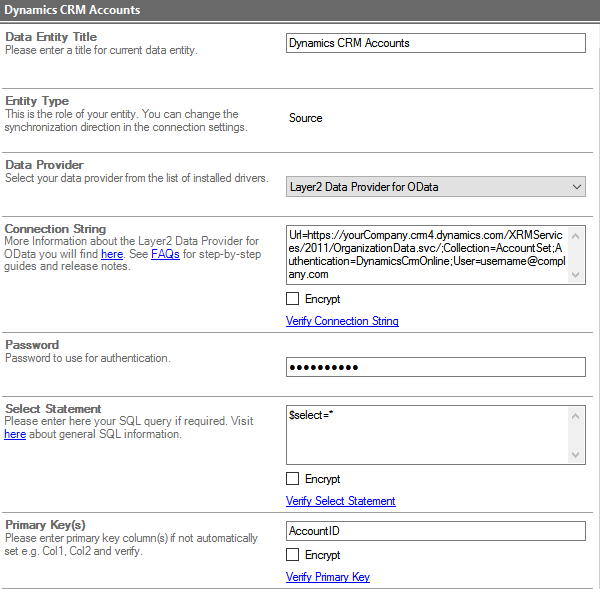
Fig. Example configuration to connect to Microsoft Dynamics CRM Online (AccountSet).
To connect, please select the Layer2 Data Provider for OData. It will make use of the Open Data Protocol web services to synchronize the data.
You need a connection string to connect, authenticate and request the data. For CRM, you can use something like this:
Url=https://yourcompany.crm4.dynamics.com/XRMServices/2011/OrganizationData.svc/;Collection=AccountSet;Authentication=
DynamicsCrmOnline;User=youruser@yourcompany.onmicrosoft.com;
Password=yourpassword
Please note: The authentication schema DynamicsCRMOnline is for Microsoft User Accounts, not ADFS integrated user accounts. Please use DynamicsCRMADFS instead for ADFS. For additional supported authentication types for CRM, see the Layer2 OData Provider Documentation. If your type of CRM instance is not listed or for additional assistance, contact support@layer2solutions.com.
Click Verify Connection String to validate that data is correct and that the connection works. If it works as expected, click on Preview Data (in the right-hand Action menu) to check the columns being pulled. You should see something like this:
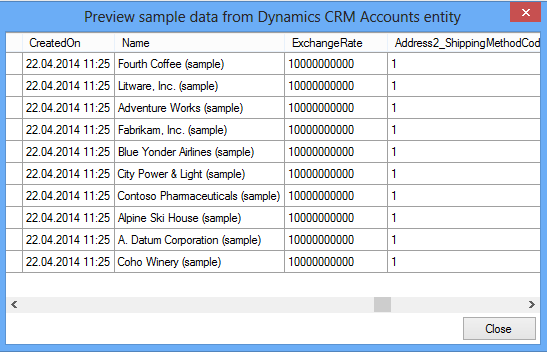
Fig. Example data preview of the Microsoft Dynamics CRM request.
The data preview gives you a first look at the fields and content - very helpful for the next steps to improve the query and map the fields to SharePoint columns. This preview should be the same as if you loaded the OData URI into a browser to view the results as XML (and this can be a great way to see what fields are available in the collection, what data types they are, as well as quickly modify the select query, which is explained in more detail below).
If you took the URL used in the connection string and loaded it into a browser, you would see something like this:
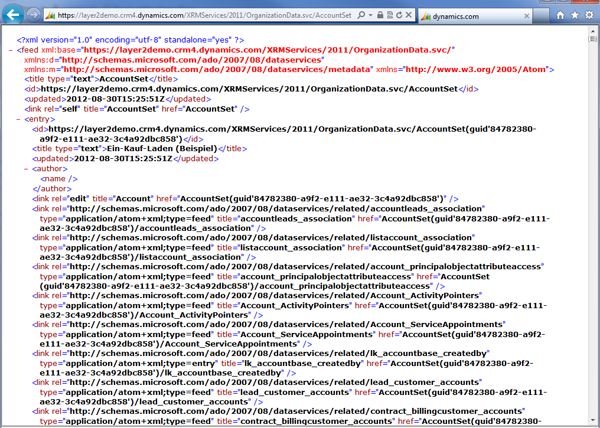
Fig. Example OData data coming from the Microsoft Dynamics CRM using the URI in a browser (no need to understand this in detail).
You can retrieve any kind of information from your Dynamics CRM instance through this protocol, using the OData query syntax.
To design an OData query, you can simply use your browser of choice. Most query conventions are supported for CRM, but not all. For specific details, see the Microsoft Dynamics CRM OData specification. The Dynamics XRM Tools also offer an easy-to-use OData Query Designer that runs directly on your CRM instance.
To start with, just enter the following url in your browser to display
an xml-representation of your accounts (replace <your_company> with the
correct CRM url):
https://<your_company>.crm4.dynamics.com/XRMServices/2011/OrganizationData.svc/AccountSet
You can also add a specific query parameter to only include specific fields. To retrieve, for example, only the Company Name you can add a $select – parameter to your query:
https://<your_company>.crm4.dynamics.com/XRMServices/2011/OrganizationData.svc/AccountSet?$select=Name
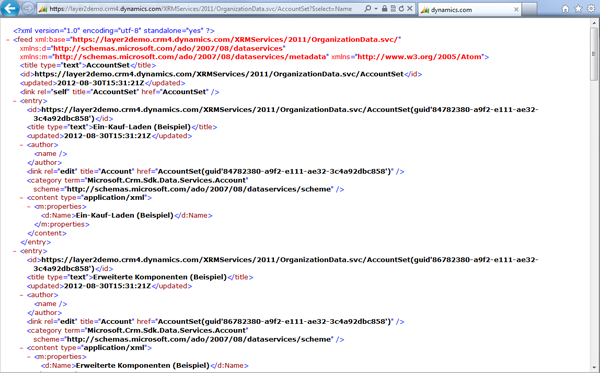
Fig. Example of retrieving only the Account name field with an OData query in a browser.
IMPORTANT The field names in Dynamics CRM are case sensitive! So for example, AccountName, accountName, and accountname are all different fields. If you are getting errors that you cannot get that specific field, check to make sure you have the spelling and case correct.
Once you have built your query, you will add this to the Select Statement field of the Data Entity in connection settings. It will be formatted like this - this example selects only the Name field (account name):
$select=Name
Limiting the number of properties to only the properties needed is
necessary to increase the performance of the overall process. Limiting the
number of retrieved items can also be of interest, as deactivated accounts might
not be needed on the SharePoint side. To filter the accounts, you will need to
use the $filter – parameter as follows:
https://<your_company>.crm4.dynamics.com/XRMServices/2011/OrganizationData.svc/AccountSet?$select=Name&$filter=StateCode/Value eq 0
The two final queries in this example are as follows:
For Accounts:
https://<your_company>.crm4.dynamics.com/XRMServices/2011/OrganizationData.svc/AccountSet?$select=AccountId,Name,
EMailAddress1,
Address1_StateOrProvince,Address1_City,Description,
Address1_County,Fax,Telephone1,Telephone2,WebSiteURL,Address1_Line1,Address1_PostalCode&$filter=StateCode/Value
eq 0
For
Contacts:
https://<your_company>.crm4.dynamics.com/XRMServices/2011/OrganizationData.svc/ContactSet?$select=ContactId,FirstName,LastName,
FullName,EMailAddress1,
Address1_StateOrProvince,Address1_City,Description,Address1_County,JobTitle,Fax,MobilePhone,Telephone1,Telephone2,WebSiteUrl,
Address1_Line1,Address1_PostalCode,ContactId,ParentCustomerId&$filter=StateCode/Value
eq 0
Please read more about general OData query options here:
http://docs.oasis-open.org/odata/odata/v4.0/odata-v4.0-part2-url-conventions.html [4.0]
http://www.odata.org/documentation/odata-version-3-0/url-conventions/ [3.0]
http://www.odata.org/documentation/odata-version-2-0/uri-conventions/ [2.0]
You can optionally disable inserts, updates and deletes in the Layer2 Cloud Connector just to be sure that nothing is changed in the CRM instance. Also take care about the uni-directional and bi-directional option, so that the data is pushed in the correct direction.
Finally you need a primary key (field with unique values) to sync. We chose the AccountID in this case and entered it in the Data Entity form in the Connector.
Set Up the Microsoft SharePoint Data Entity
You will configure the SharePoint list data entity in the same way as done for the CRM instance, by selecting a data provider and provide a connection string.
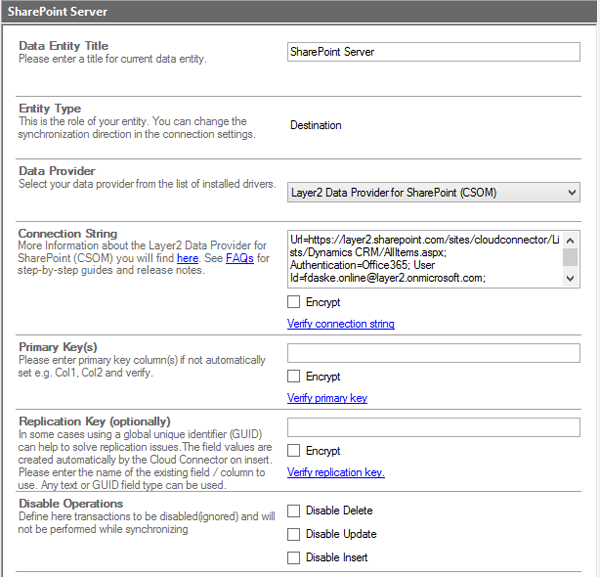 Fig. Example connection to a SharePoint Online contact list.
Please use the Layer2 SharePoint CSOM Provider (included with the Cloud Connector) to connect to any SharePoint on-premise or SharePoint Online/Office 365. The connection string for the list "Dynamics CRM" can look like this:
Url=https://mycompany.sharepoint.com/sites/cloudconnector/Lists/Dynamics CRM/AllItems.aspx; Authentication=Office365; User Id=myUser@mycompany.onmicrosoft.com;
Remember that you have to create the destination list manually with all columns required to host your query data. Read more about connection strings to connect to Office 365, SharePoint Online, or SharePoint on-premises here. Please note that you can connect to any other data destination, such as to a SQL database, as well.
There is no need to enter a primary key, the provider automatically uses the SharePoint item ID.
Configure Mapping
As a last step for the setup, you will need to configure the column/field mapping. It may look something like this:
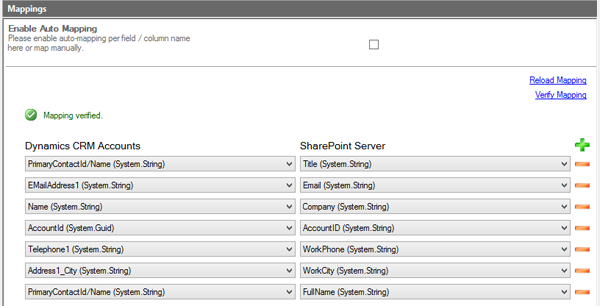
Fig. Example field mapping for CRM Accounts and SharePoint contact lists.
Please note the mapping to the Title field (usually a required field in SharePoint) and to the additional field AccountID. You have to add more fields to complete the contact data as usual in SharePoint and Outlook.
Initiate First Synchronization Run
When all settings are verified, please go to connection root and run the connection manually for the initial synchronization. Please note, that it could take some time to transfer all elements, depending on configuration and amount of data. You can take a look at your SharePoint list to check the progress.
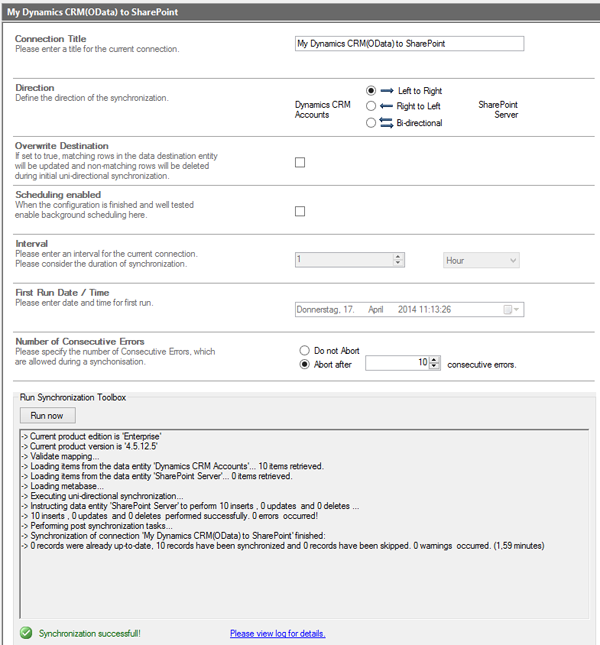
Fig. First synchronization from CRM to SharePoint.
See Your CRM Accounts in the Office 365 SharePoint List
Once the synchronization is complete, take a look at your list. All items are in there after running the connection.
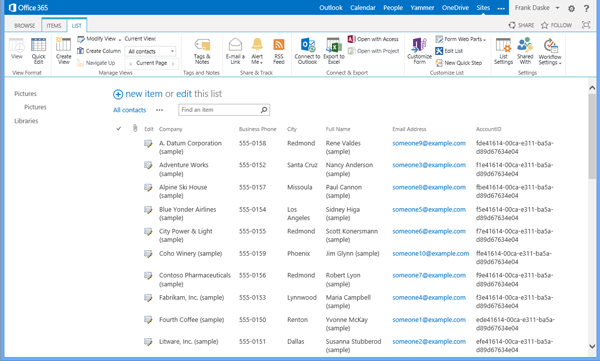
Fig. Synchronized Accounts in a native SharePoint contact list.
Please note that only modified items are transferred with the next update - this means that you can setup change notifications per RSS/email or list workflows in the cloud without worry, as the whole list won't be updated each time.
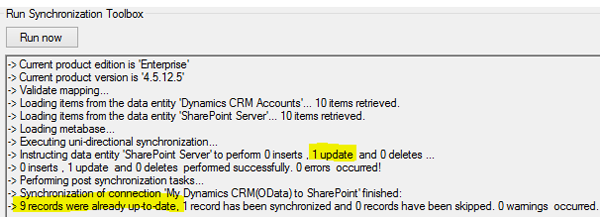
Fig. Only changed data is transferred with the next sync.
You can add additional (unmapped) "SharePoint only" columns, such as attachments, images, or managed metadata. These unmapped columns will maintain their values while the other mapped fields are updated with data from CRM. You can do anything you can generally do with a SharePoint list, without any restrictions (e.g. search). Now that you have a working connection, don't forget to setup the background update to keep data current! You can configure this in the connection settings to have scheduled updates every hour or daily.
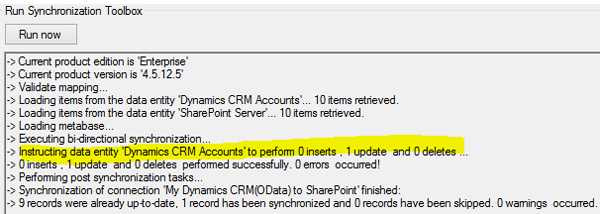
Fig. With a bi-directional sync enabled, you can write back changes made in SharePoint or Outlook to your CRM instance.
As the list is a native SharePoint contact list, you also can sync it to Microsoft Outlook using the SharePoint list toolbar ("Connect to Outlook"). You can access the SharePoint list via mobile devices as well.
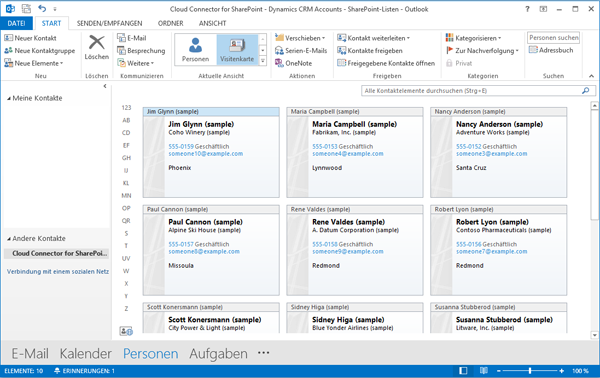
Fig. Microsoft Dynamics CRM contacts synced to Outlook via a native SharePoint list.
There are a lot of tools on the market that allow to display Microsoft Dynamics CRM data in the SharePoint user interface, e.g. as a Web Part. But syncing CRM data with native SharePoint lists resolves many issues and allows you to use features like search and Office integration, metadata, or attachments, offline and mobile access, change notifications by RSS and email, and workflows that trigger on data change. Users do not need any direct CRM access (or license). They work in a simplified architecture and UI with native SharePoint lists - with highest security and best performance.
Next steps: Download a FREE Shareware Edition of the Layer2 Cloud Connector
You can download a free shareware edition of the Layer2 Cloud Connector for Office 365 and SharePoint after registration here. If you have questions, please contact sales@layer2solutions.com directly.
Explore frequently asked questions by topics.
Ready to go next steps?
